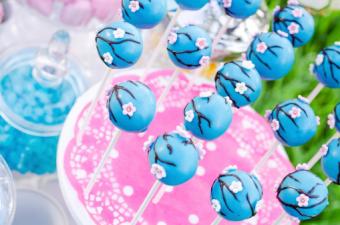
Decorating cake pops doesn't mean you need to have mad baking skills. Instead, use these simple techniques to make your cake pops stand out on the dessert table.
Sparkling Swirl Design
A swirling with a little sparkle doesn't take much to create. Make your cake pops and wait for them to harden after dipping. Then use a small round tip with candy melt to pipe on colorful zig-zags and swirls. Then immediately shake edible glitter or jewel dust over the pops to create the sparkling design.
Glittering Rose Cake Pop
Take the sparkling swirl design another step and create a glittering rose instead. To make this design, you'll want to be more controlled with your swirl. Start at the top of the cake pop and carefully wind your way around the cake pop, stopping about three-quarters of the way down. Immediately cover with white sanding sugar. Attach fondant leaves with additional melted candy as adhesive.

Blue and Gold Star Pops
For a basic but gorgeous design, select two contrasting colors. Dip each cake pop in one of the colors, then decorate it with the opposite color. For example, midnight blue and yellow gold create a striking contrast together. Use a small star stamp to cut mini stars out of fondant or gum paste in each color prior to making the cake pops. Dip the pops (half in each color) and allow them to dry partially. Before the coating has solidified, place the mini stars in a pattern on the pops. Finish some with sprinkles and add ribbons.

Chocolate Henna Designs
Vivid colors pop against a chocolate candy coating on cake pops. Simple henna designs can be drawn free-hand, making them a gorgeous addition to your pops.
- Make the leaf pattern by drawing the central vein and the smaller branches in a bright baby blue. Layer orange over the central vein and then dot the tips of the leaves.
- Create the fringe pattern by drawing swags around the top third of the cake pop using the same bright baby blue color. Pull the points to the top of the pop. Then add small dots below the swags. Add red along the swags and to the top of the pop; then circle the dots and pull down to create a fringed design.

Ribbon Topped Cake Pops
A ribbon topped cake pop looks festive for virtually any occasion. Start by rolling the cake pop in sprinkles that match the party or event theme or decorations. Then roll gum paste or fondant in a complementary color to about 1/8". Cut one loop and make the V-shape at the ribbon's end. Set it on its side with a little bit of crumpled paper towel in the center to hold the shape. Then make the other loop. Put them together and pinch in the center to create a more authentic looking ribbon. Add to the cake pop with a little additional candy coating.

Cherry Blossom Pops
Cherry blossom cake pops make a lovely addition to any celebration in the spring. Start by making the flowers with a mini blossom cutter and rolled pink fondant. Add a small white dragee for the blossom's center, affixing it with a dab of candy melt or water. While the blossoms dry, fill a pastry bag fitted with a small round tip with melted chocolate.
Draw branches on the cake pops. Don't worry if they aren't perfectly finished; you want them to trail off into a thinner line just like an actual tree branch. When the blossoms are set, add them to the pops on the branches in a random manner for a realistic design.

Add Pizazz to Your Pops
With just a little extra effort, you can make cake pops that will impress your friends and family. The additional time will be worth the striking display they make before everyone dives in to eat them!


