
Learning essential piping tips and techniques is the key to creating decorative pieces of pastry perfection. While the success with the basic techniques comes from the combination of three important components: icing consistency, pressure control, and correct bag position, learning the correct bag position is perhaps the most vital to achieving the proper piping techniques.
Shell Border
The basic shell border is achieved using an open star tip, such as numbers 16 or 24. As a beginner, a mid-sized open star tip is best because it will allow for consistent icing flow without a lot of pressure.
Instructions

- Position your icing bag at a 45 degree angle from the surface of the cake. Be sure you have positioned your tip so that it is close enough to the cake that it is nearly touching. It is best to start your shell border at the edge closest to you and work your way around the surface of the cake.
- Apply a generous amount of pressure to the bag, allowing the icing to fan out slightly as it comes out. The icing will naturally force the tip of your bag upward, which is fine.
- Gradually pull the tip away from your initial starting point horizontally, releasing the pressure gradually as you do. Then release pressure completely as come to a stop. This will leave a fanned design that narrows almost to a point at one end.
- Holding your bag at the same 45 degree angle, place your tip at the next starting point, which should be just where the end of the first shell left off, or the point at the base of the fan. Pipe the next shell.
- Continue this pattern until you have completely covered the perimeter of the cake.
Tips
- Avoid lifting the piping bag too suddenly when creating the fan, as this will create a bumpy, uneven appearance.
- A shell border is best achieved with icing that is of medium consistency.
- Continuity is key with a precise shell border. Therefore, try to maintain a consistent pressure as you work on each shell.
Drop Stars
Drop stars can be one of the most simple icing creations to achieve. They can be used as placeholders for candles, as decorative embellishments around the sides of a cake, or even grouped in clusters and adorned with leaves to create a semi-floral pattern. Drop stars are created using an open star tip like numbers 16 or 21.
Instructions

- Hold your piping bag straight up from the surface of the cake at a near 90 degree angle. Make sure that your tip is positioned directly above surface level with a small space of about an 1/8 inch in between the base of the tip and the cake.
- Gently apply pressure to the bag, allowing the icing to creep out from all slats of the tip. Do not move your icing bag as the star is formed. Hold steady in one position until the correct size is achieved.
- As the star nears completion, release pressure from your piping bag and gently raise your piping bag upward from the star position.
Tips
- Be sure that you have completely stopped pressure before raising your tip from the surface of the star to prevent a peak from forming in the center.
- Remember, the size of the tip you are using can completely change the appearance of the star.
- Stars are best achieved with icing that is medium to thick consistency.
Rosettes
Rosettes provide the design of a rose, without actual separate petals. These look nice as a border side-by-side, but can also be used to cover a complete cake for a more dramatic look. Adding leaves to rosettes can further enhance their floral appearance. Rosettes are created with an open star tip, such as tip number 16.
Instructions

- Hold your bag at a 90 degree angle from the surface of the cake, just as you would if you were creating a star, with a small gap between the tip and the cake.
- Gently apply pressure to achieve a star while holding your piping bag at one point. Do not release pressure once the star is complete, but raise your tip slightly and continue to squeeze a circular run of icing around the center of the star in one complete rotation.
- Bring your swirl back to a stopping point, after a complete rotation, to the center of the original star. Release pressure slowly as you come to the center and fully stop before raising your tip to prevent creating a peak.
Tips
- Remember, consistent pressure is key. Stopping or changing pressure mid-rosette can ruin the appearance of your rosette.
- Thin icing rosettes will not be well-defined. Thick icing will make it difficult to maintain even pressure. Therefore, medium consistency icing is best.
Swirled Drop Flowers
Swirled drop flowers can be created with a few different type of piping tips. The most commonly used is a closed-style star tip, often referred to as simply a drop flower tip. Number 224 is the perfect tip for beginners because it is small in size and easy to maneuver. This tip has slats that are cut at an angle and a closed point at the center.
Instructions
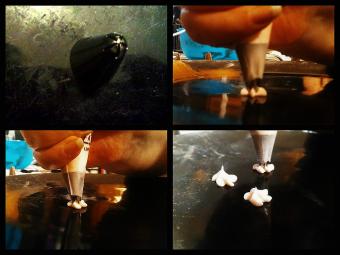
- Hold your piping bag at a 90 angle from the cake surface, leaving a slight space between the cake and tip.
- Apply gentle pressure to the icing bag, holding steady at first, then gradually twisting the tip to the right by only a few millimeters to create a slight swirled effect. Be careful to keep the center of the tip seated in the same position. This will give a lifelike appearance of dimension to the petals.
- Release pressure when petal reaches the desired size and then carefully pull the piping tip away from the flower vertically.
Tips
- With drop flowers, the thicker the icing is, the better the appearance.
- Finish swirled drop flowers with a simple bead of icing at the center for a completed look.
- Drop flowers can be made using royal icing on wax paper, allowed to dry, and then moved to the cake surface.
Writing
Writing with icing is an art all its own. Beginners usually find a tip size 3, which is used below, to be the easiest to work with because a bit larger size allows for easy icing flow without a lot of pressure. You can achieve attractive writing with several different sizes of open and rounded tips that you may have in your collection. It can be fun to experiment with various sizes and styles.
Instructions

- Hold your icing bag in a position that is comfortable for you. Think about how you write on paper with a pencil. Do you hold the pencil upright at 90 degrees or at a 45 degree angle? The position that is most comfortable when writing with a pen will most likely be more comfortable for you with a piping bag.
- Scripted handwriting is often easier to achieve than block letters. Applying gentle, but continuous pressure, begin making your lettering. Try to make each word with a continuous movement, as this will eliminate an uneven appearance.
- When you are at stopping point with a letter or word, be sure that you have stopped squeezing completely. Thin strings of frosting have a tendency to hang onto the tip when you raise it from the cake surface. Therefore, it can be helpful to "break off" the icing by either slightly burying the tip at the stopping point, or by using a quick twist of your wrist to turn the direction of the tip.
Tips
- Writing with icing can be difficult and does take some practice. It is a good idea to practice writing on wax paper before attempting the process on the cake itself.
- Be sure to leave room for your written sentiment while decorating. Letters without enough space will look crowded and hard to read.
Dots
Polka-dots can be a fun way to enhance a birthday cake and small dots can lighten up a distinguished cake design. Dots are an easy piping technique that can be created with a round tip of various sizes, even down to the smallest writing tip, which is number 1.
Instructions

- With your bag held at a 90 degree angle from the cake, make sure that your tip is just slightly raised from the surface.
- Apply gentle pressure until the small dot becomes the desired size without raising your tip from its original position.
- Release pressure and raise your tip from the completed dot vertically.
Tips
- Be careful not to move your piping tip while creating the dot as this will give it an ovular, or uneven, shape.
- Pay close attention to air bubbles in your icing bag. Trapped air being forced out of the bag can ruin a dot.
- Completely end pressure before lifting your tip from position.
Beading
Beads are a simple and elegant way to add a touch of pizazz to a cake. If you can make dots, you can also create a line of beads using the same open tips, such as number 4 or 5. There is one slight difference in technique, but is easy to learn with a bit of practice.
Instructions

- Hold your piping bag at a 90 degree angle, with tip slightly raised from the surface.
- Apply gentle pressure to the bag and raise the tip slightly as you do.
- When the bead is the desired size, release pressure and pull upward away from the bead.
- Place your tip directly beside your first bead, repeating the process. This can be repeated continuously until you have the desired number of beads on your cake.
Tip
- If you have an issue with slight peaks on the top of your beads, which is common, allow the icing to set up or dry, then use your fingertip to dab the top of each bead to flatten.
Leaves
Simply adding leaves to rosettes, drops stars, or drop flowers is the perfect way to set them off with a touch of realism. There are a few different types of leaf tip, but all tips will require the same piping techniques to accomplish the best structure and appearance. The tip pictured is number 352.
Instructions

- Hold your tip so that the open slats of either side of the leaf tip are in a side to side position with the point in the center as pictured. Your piping bag should be held at a 45 degree angle from the cake surface.
- Apply heavy pressure so that the icing fans out from either side of the tip, gradually pulling away from your starting point horizontally as you do.
- As you come to the ending point of your leaf, release pressure on the bag and gently pull away to form a point at the tip.
Tips
- When adding leaves to flowers, position your piping tip as close as possible to the base of the flower.
- The faster you move your tip away as you squeeze, the thinner the leaf will be. This is a good technique to use for vines.
Grass
Learning the technique to make grass can be a handy skill for adding a little something extra to character cakes or scenery. Grass is made with piping tip number 233, which is available in different sizes.
Instructions

- Grass can be applied to the cake in either a standing upright position, which requires a 90 degree angle, or slightly slanted, which is accomplished at a 45 degree angle. Hold your bag according to the desired effect you wish to achieve.
- Apply pressure gently, pulling the piping bag away from your starting point in either a straight upward or slightly slanted position depending on your desired effect.
- To create a patch of grass, repeat the process placing your tip directly beside the original cluster of grass and continue until the area is filled.
Tip
- When piping grass, lingering to long in one position will create a result that looks clumpy instead of grass that is well defined. Therefore, move quickly as you apply pressure to the bag.
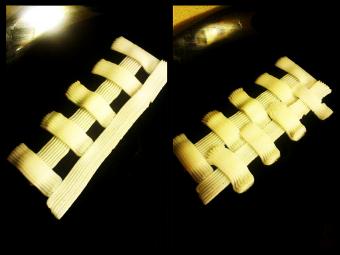
Basket Weave
Creating a two-dimensional look with icing is often necessary to add more depth to a frosted cake. Basket weave piping is the perfect way to accomplish this. The technique can take some time to master, but once you do, it will be well worth the effort. The look is achieved with the basket weave tip number 47, which is flattened with ridges on one side.
Instructions

- With your bag held at a 45 degree angle and the ridged edge facing upward, pipe a vertical line with a steady pressure to create an even base line.
- Working with your first vertical line, pipe horizontal lines spaced evenly apart across it with your tip in the same position. Keep the spaces between each line the same width as the piping tip you are using.
- Pipe your next vertical line so that it is covering the ends of the horizontal stripes that you just created with your piping bag.
- You will now be ready to add your second set of horizontal strips. These should be started right at the base of your first vertical line at the empty spaces you left between the first set of horizontal lines.
- Continue in this fashion until you have covered the desired surface area of the cake.
Tips
- Basketweave piping can be a lengthy process if you plan to cover an entire cake. Take time to rest your hands as you work to maintain a steady and even appearance.
- Keep in mind that creating a tightly woven design is all about precision of spacing and continuity in the lines.
- Be careful to always keep the ridged edge of the piping tip facing upward as you work.
- The closer you can tuck your tip to the edge of existing stripes, the better your end result will be.
Roses and Petals
Creating roses allows you to add incredible floral designs to a cake. The art of crafting roses with icing is a bit more complex than many of the piping techniques listed here, requiring not just a few additional tools, but several steps as well. Roses can be created in a wide array of different sizes and styles. For comprehensive, step-by-step instruction on how to create roses, be sure to check out How to Make Icing Roses for a Cake.
Practice Makes Perfect
With these ten piping skills under your belt, you can create some pretty fantastic cake designs. Some of these skills can be difficult to achieve at first, but with a bit of practice and attention to detail, you can be piping like a professional cake decorator in no time.


