Cookie Decorating Ideas for Kids

Get Ready to Decorate!

https://cf.ltkcdn.net/cake-decorating/images/slide/209683-850x680-boydecoratingcookies.jpg

Kids of all ages enjoy helping out in the kitchen. Whether they are four or 10, a great job to give them is decorating duty. Bake your favorite flavors of cookies, whip up some delicious frosting, and assemble decorations like fruit, nuts, and candies and let the fun begin.

Offer the kids a little direction for creating some designs and then let their creativity take charge!

Polka Dot Dinos

https://cf.ltkcdn.net/cake-decorating/images/slide/209714-850x680-dinocookies.jpg

Polka dots are easy for kids of all ages to master. They also work on a variety of shaped cookies ranging from flowers to holiday cookies and even fun animals like dinosaurs. Recreate the dotted dino with these steps:

  1. Cover the cookie in white royal icing.
  2. Fit a pastry bag with a coupler and small round tip. Fill with red icing.
  3. Lightly squeeze the icing out until you make a small circle. Quit squeezing and then pull the bag away.

This design is easy enough for even the youngest kids to do with a little assistance from an adult for filling pastry bags.

Happy Hopping Frog

https://cf.ltkcdn.net/cake-decorating/images/slide/209702-850x681-frogcookieonplate.jpg

Get hoppin' with this fun spring design. Appropriate for older kids, this fun frog takes several steps to complete.

  1. Spread green royal icing over the cooled cookie. Lightly sprinkle green sugar on top.
  2. Put white frosting in a pastry bag with coupler and round tip and make two large eyes at the top of the frog's head.
  3. Using black frosting in a pastry bag with coupler and round tip, make large black pupils in the center of the eyes.
  4. Center the mouth and make a wide smile using the black frosting.
  5. Add a small dot of pink fondant to represent the frog's tongue. Cut it from pre-packed rolled fondant to make things easy.
  6. Finally, put green fondant into a pastry bag with coupler and round tip and add an outline to the frog shape.

Yin Yang Heart

https://cf.ltkcdn.net/cake-decorating/images/slide/209713-850x680-yellowplatewithheartcookie.jpg

Older children (and younger ones with steady hands and some assistance) can create a fun yin yang heart design. Royal icing is essential for this look.

  1. Put pink royal icing into a squirt bottle with small round tip.
  2. Put white royal icing into a squirt bottle with small round tip.
  3. Carefully outline half the heart using the white icing. Fill in the center and smooth any rough spots with a toothpick.
  4. Outline the entire heart in pink (including outside the white half). Fill in the opposite side with pink, smoothing with a toothpick as needed.
  5. Make a small pink dot at the top of the white half and a white dot on the bottom of the pink half.
  6. Lightly shake to settle the frosting.

Smiley Face Cookie

https://cf.ltkcdn.net/cake-decorating/images/slide/210047-850x607-smileycookie.jpg

A happy face is sure to bring a smile to anyone who eats these cookies! Whip up some buttercream and tint separate amounts yellow, red, and black. Add the black to a pastry bag with coupler and a round tip and the red into a pastry bag with coupler and a small petal tip.

  1. Spread the yellow buttercream on the cookie, smoothing so you have a flat surface to work on.
  2. Use the red frosting with petal tip to make two eyes (two "petals" per eye). Overlap them slightly to create the heart shape as seen.
  3. Make the smiling mouth with the black frosting.

Glitter Heart Outline

https://cf.ltkcdn.net/cake-decorating/images/slide/209703-850x680-heartcookies.jpg

An intermediate project, this one is great for six to eight-year-olds who have some patience. The sparkly outline and swirl is sure to light up their faces.

  1. Cover hearts in your favorite royal icing color.
  2. Allow the royal icing to fully set (at least half a day, up to overnight).
  3. Fill a squirt bottle with a complementary color of thick royal icing.
  4. Carefully outline the heart, making a swirl into one side of the heart at the top.
  5. While the icing is still wet, flip over into colored sugar.
  6. Gently shake off excess sugar.

Detail the Car!

https://cf.ltkcdn.net/cake-decorating/images/slide/209706-850x680-carcookies.jpg

Older kids will get a small motor (skills!) workout with this fun decorating project. A steady hand and some colorful icing are all that's needed.

  1. Mix up yellow, turquoise, white, pink, and black buttercream.
  2. Fit pastry bags with couplers and small round tips.
  3. Start by outlining the details in the center of the car (windows, door) and work your way outwards to the headlights and car outline.
  4. To make the tires, use black to make a circle in the center. Fill in black around the center circle to represent the tires, then fill with white to create the rims.

Easy Cherry Nut Stars

https://cf.ltkcdn.net/cake-decorating/images/slide/209704-850x680-nutsandfruitcookies.jpg

This design takes advantage of a pattern design and a little pre-baking decoration. Even the youngest kids can help place almonds on the cookies.

  1. Before baking, place a small cherry or other berry fruit in the center of the star.
  2. Once the cookie has cooled, fill a small pastry bag with white buttercream and fit it with a coupler and small round tip.
  3. Use a dot of frosting on almond or peanut halves to secure them around the cherry. Then place a small dot of frosting between each nut.
  4. Alternate between frosting dots and nuts until you reach the tip of the star.

ABC Cookies

https://cf.ltkcdn.net/cake-decorating/images/slide/209717-850x680-ABCcookies.jpg

Kids of all ages can practice their handwriting by creating alphabet cookies. Older kids can make monograms or practice making cursive letters while younger ones can provide proof they know all 26 letters.

  1. Frost the cookies with a chocolate frosting and allow it to set until tacky.
  2. Fill a pastry bag with white buttercream or royal icing. Fit it with a coupler and round decorating tip.
  3. Write different letters on each cookie.

3D Hedgehog Design

https://cf.ltkcdn.net/cake-decorating/images/slide/209707-850x680-hedgehogcookies.jpg

Not all cookies have to involve copious amounts of frosting. Instead, make these fun 3D hedgehogs with almond slivers. This is a great decorating project for young kids who might be too messy with frosting or impatient when it comes to creating a bigger design.

  1. Make your favorite thick and chewy or puffy cookie. Gently shape one end a bit narrower for the face.
  2. Before baking, put slivered almonds in the hedgehog so they stick up like spikes.
  3. After baking and cooling, use edible pens to create the dots for the eyes.

Swirled Double-Stacked Cookie

https://cf.ltkcdn.net/cake-decorating/images/slide/209708-850x680-aniseheartcookie.jpg

A two-toned design surrounds a second cookie layer on this fun cookie. It's not too difficult, but youngsters might not have the patience to create the white and pink swirls.

  1. Cover the cookie with royal icing in your favorite dark or bright color.
  2. Add a few dots of white royal icing.
  3. Take a toothpick and carefully pull the white icing outward, slightly swirling and rounding the design to create the effect shown.
  4. Place a smaller cookie on top of the first cookie. Add a small dot of icing in the center and place a candy or fondant cut out on top that is the same shape as the larger cookie.

Starry Cookie Pop

https://cf.ltkcdn.net/cake-decorating/images/slide/209710-850x680-cookiepop.jpg

Turn your favorite cookie into a lollipop by baking it with a wooden skewer on the bottom. Once it's cooled, you're ready to draw this intermediate-level design!

  1. Frost the entire cookie with yellow-tinted royal icing.
  2. Before the first coat dries, use a pastry bag with coupler and small round tip to make dots all over the star.
  3. Take a toothpick and, working from the top of each dot to the bottom, pull it through the center of the dot to make a heart-shape.

Double Dots

https://cf.ltkcdn.net/cake-decorating/images/slide/209711-850x680-polkadotcookies.jpg

Dots are simple for all ages, and especially appropriate for the youngest of kids who want to help. Once they have mastered a single dot, up the ante with a double-dot design.

  1. Fit a pastry bag with coupler and medium round tip.
  2. Fill with your favorite color of royal icing and make large dots all over your cookie.
  3. Fit a pastry bag with coupler and small round tip.
  4. Fill the bag with small tip with a complementary color of royal icing and make second dots in the center of the larger dot.
  5. Gently tap once on the work surface to help the icing settle and eliminate air bubbles.

Striped Squirrels

https://cf.ltkcdn.net/cake-decorating/images/slide/209712-850x680-squirrelcookietray.jpg

Add a nutty squirrel to your cookie tray with this easy striped design. It's perfect for kids who want to do a more intricate design with multiple colors but don't necessarily have a steady hand yet.

  1. Fill a squirt bottle with round tip with bright green royal icing.
  2. Outline the squirrel and then make wavy diagonal stripes across the squirrel.
  3. Fill two more bottles with yellow and pink royal icing colors.
  4. Fill in every other stripe with pink icing.
  5. Fill in the remaining stripes with yellow icing.
  6. Return to the green icing and make a small dot for the eye.

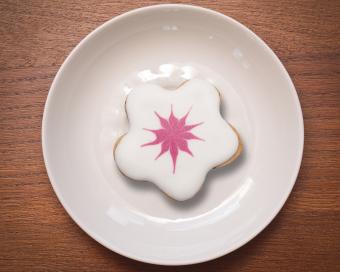
Flower Power

https://cf.ltkcdn.net/cake-decorating/images/slide/209715-850x680-flowercookieonplate.jpg

A little flower power is perfect for spring and the dual color combination works especially well with one bright vivid shade and a lighter complementary shade. Kids of all ages can decorate this cookie but it will turn out the best for children with steady hands.

  1. Fit a pastry bag with coupler and small round tip. Add white royal icing to the bag.
  2. Outline the cookie with the royal icing and then fill in the entire cookie. Lightly tap to help eliminate air bubbles and spread the icing evenly.
  3. Put bright pink royal icing into a small squirt bottle with round opening.
  4. Make a medium-sized dot in the center of the flower.
  5. Place the toothpick at little bit inside the pink circle and pull outwards into the white icing. Repeat until you have created a sunburst shape.

Realistic Butterfly

https://cf.ltkcdn.net/cake-decorating/images/slide/209716-850x680-butterflycoookie.jpg

Older kids can use royal icing to create a butterfly so realistic, it might just take off the plate!

  1. Fill pastry bags fitted with round couplers and round tips with periwinkle, pink, black, and yellow royal icings.
  2. Use the periwinkle bag to outline the butterfly and then fill in. Gently shake the butterfly to even the icing out and pop air bubbles.
  3. Allow the periwinkle base time to set - at least four hours.
  4. Use the black icing to create the body; draw a straight line between the wings.
  5. Use the pink icing to create the curled wing designs as shown, being careful not to smudge the black.
  6. Make two yellow dots next to the black body across from each other.

Simple Lattice Design

https://cf.ltkcdn.net/cake-decorating/images/slide/209718-850x680-latticecookie.jpg

A lattice design can be done on any cookie shape. The important thing to remember is to space the stripes evenly. Older kids should be able to eyeball this, but younger ones might need some help.

  1. Frost the cookie with pink royal icing.
  2. Add white royal icing to a pastry bag fitting with a coupler and round tip.
  3. Make diagonal stripes across the entire cookie, spacing them evenly.
  4. Make diagonal stripes from the opposite side of the cookie, taking care to keep their spacing similar to the first set.

Mouthy Monsters

https://cf.ltkcdn.net/cake-decorating/images/slide/209719-850x680-monstermouthcookies.jpg

These mouthy cookies are perfect for little monsters of any age. You can even make them healthy by skipping traditional frosting and using strawberry or raspberry yogurt instead. You'll just need royal icing to help "glue" things together.

  1. Use a flat spatula to spread the bottoms of oatmeal raisin or monster cookies with your favorite pink frosting or pink yogurt.
  2. Put the cookies together, securing in the back with a little royal icing. Use a toothpick to prop the mouth open until the icing hardens. Keep in the refrigerator during this portion if you use yogurt.
  3. Once the icing dries, line the front of the bottom cookie with mini marshmallows.
  4. Add a couple slivered almonds to the top cookie, securing with a small dab of royal icing as needed.

Dipped Sprinkle Cookies

https://cf.ltkcdn.net/cake-decorating/images/slide/209720-850x680-dippedmacaron_crop.jpg

While macarons might be difficult for kids to make, they can certainly help decorate them! The fancy cookie calls for a simple yet elegant decoration; dipped sprinkles fit the bill. Kids of any age can help with these.

  1. Melt white chocolate candy melts according to package directions. Allow to cool until it can be handled but is still runny enough for dipping.
  2. Put sprinkles in a shallow dish.
  3. Gently hold one end of the cookie and dip about 1/3 to 1/2 way into the melted white chocolate. Gently shake excess.
  4. Then dip the cookie immediately into the sprinkles.

Elegant Fruit Decorations

https://cf.ltkcdn.net/cake-decorating/images/slide/209686-850x680-christmascookies_horiz.jpg

Just because kids are helping decorate doesn't mean you can't create a sophisticated design. Youngsters of any age can help if the fruit zest is prepared by an adult.

  1. Put a dab of royal icing in the center of the cookie.
  2. Add a small pinch of orange or lemon zest on top, pressing lightly.
  3. Put powdered sugar in a sifter and lightly tap over the cookies to give them a dusting.
  4. If desired, use a dash of nutmeg, cinnamon, or cocoa powder on some cookies.

Super Fun Squiggles

https://cf.ltkcdn.net/cake-decorating/images/slide/209722-850x680-squigglecookies.jpg

A squiggle design can be classic or haphazard. The results will depend on the kids doing the decorating. A few carefully placed silver dragees can make any squiggle design look elegant.

  1. Frost the cookie with a light frosting, such as pink, using royal or buttercream frosting.
  2. Put red royal or buttercream frosting into a pastry bag with coupler and small round tip.
  3. Start at one end of the cookie and move back and forth quickly, overlapping just a bit.
  4. Place a few silver dragees on the squiggle lines to add some elegance.

Whether you're cookie decorating with kids for fun or for a festive holiday, having some basic instructions are sure to get the kids started with their own creations!

Trending on LoveToKnow
Cookie Decorating Ideas for Kids