A graveyard cake creates a spooky scene that can often double as a table centerpiece or party showpiece due to the detailing. Choose one to wow your guests and delight kids of all kinds on Halloween.
Creepy Multi-Concept Cake
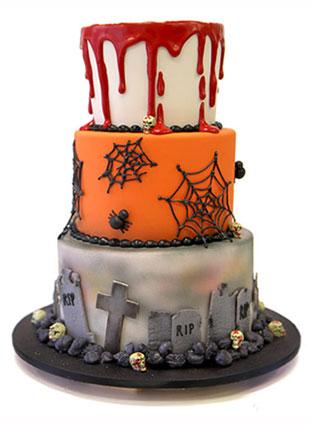
A graveyard makes an excellent base for this three-tiered cake.
Supplies
This cake will need three baked, cooled, and crumb-coated cakes in graduated sizes (for example, 6, 8, and 12 inches) before you start decorating.
- Buttercream frosting
- Fondant frosting
- Royal icing
- Food dye
- Airbrush gun and tools
- Food-safe paintbrush
- Skull candies
- Rock candies
- Gravestone cookie cutters
- Pastry bag with couplers
- Round tips
- Parchment paper
- Stacking supplies, like plates and dowels
Decoration Instructions
Make the Halloween cake decorations a day ahead of time so they have time to set.
Gravestones
- Tint fondant gray and roll out to approximately 1/4 to 1/8 inch thickness. Don't worry if the fondant isn't smooth, as you want there to be some texture to the gravestones.
- Use the gravestone cookie cutters to cut out the gravestones.
- Put black-tinted royal icing into a pastry bag with coupler and a small round tip. Write RIP and other short epitaphs on stones.
- Use the paintbrush and thinned black royal icing to create shading on the gravestones as needed.
- Allow to air dry before adding to cake.
Spider Webs
- Spread parchment paper over your work surface.
- Fill a pastry bag with black royal icing and fit coupler with a small round tip.
- Draw spider webs on the parchment paper, doubling the number you want, in case some break.
- When dry, carefully peel off parchment paper before use.
Cake Instructions
Each tier of the cake has a distinct look that creates a cohesive theme once assembled.
- Roll out white fondant and cover the largest tier and smallest tier. Set the smallest tier aside.
- Using airbrush techniques, create a night scene in shades of gray, pink, and yellow on the sides and top of the largest tier. Set aside.
- Tint fondant orange and roll out to approximately 1/4-inch thickness. Cover the medium sized tier.
- Stack the three tiers together.
- Tint buttercream frosting black and make small oval dots using the round tip around the base of the middle and top tiers.
- Tint royal icing bright red and carefully spread on the top of the top tier, allowing it to drip artfully down the sides.
- Go back to your black buttercream pastry bag and make the heads and bodies for spiders on the middle tier.
- Use black royal icing to create the spider legs on the middle tier.
- Carefully spread a little royal icing to the back of the spider webs using the paintbrush and affix them to the middle tier.
- Use royal icing to affix the gravestone cut outs to the bottom of the bottom tier.
- Add candy rocks and skulls to the bottom of your cake.
Traditional Graveyard Cake
A traditional graveyard cake doesn't have to be boring. Spice it up with a little stacking and some special decorations.

Supplies
- 1 large rectangular cake, cooled and crumb-coated
- 1 medium rectangular cake, cooled and crumb-coated
- Cake boards and stacking supplies, like dowels
- Fondant frosting
- Buttercream frosting
- Royal icing
- Pretzel sticks
- Black candy coating, melted
- Rock candies
- Pastry bags with couplers
- Round tips
- White chocolate Halloween shapes, optional
Instructions
- Cover both cakes with 1/4-inch thick rolled fondant that has been tinted shades of green.
- Dip pretzel sticks in melted black candy coating and allow to dry.
- While pretzel sticks dry, roll black fondant out to 1/4-inch thickness and cut out tombstone shapes, either freehand or with cutters.
- Use white royal icing to add decorations to the tombstones and set aside.
- Stack the two cakes on top of one another, making sure the top one is well-supported.
- Place the tombstones in the top of the cake.
- Add a path using rock candies.
- Place pretzel rods horizontally around the top cake's edge. Use leftover melted candy coating to affix rods horizontally, creating a fence.
- Use green buttercream frosting and a large round tip to make the border around the bottom cake.
- Add more rock candies and white chocolate Halloween shapes, like skulls and crossbones, to further accessorize the cake.
Ghostly Sophistication
A graveyard cake doesn't have to be scary to be spectacular. Add a few decorative flourishes to create a pretty cake for Halloween.

Supplies
- 1 round cake, cooled and crumb-coated
- Orange fondant
- White fondant
- Gray fondant
- Black buttercream frosting
- Black royal icing
- Food-safe wires
- Pastry bags and couplers
- Round tips
- Shell tip
- Cake stencil, optional
- Toothpick, optional
- Candy rocks, optional
Instructions
- Roll gray fondant out to 1/4-inch thickness and cut out tombstone shapes. Add epitaphs as desired using black royal icing. Set aside.
- Use white fondant to shape small ghost figures on food-safe wires. Use black royal icing to create their faces. Set aside.
- Cover the cake in orange fondant, rolled out to approximately 1/4-inch thickness.
- Add tombstone shapes to the bottom of the cake and top of the cake as desired, using royal icing to secure.
- Use a medium sized round tip and black buttercream to create the rocks at the bottom of the tombstones on top of the cake.
- Use black royal icing or black buttercream to design the fencing and bats on the bottom sides of the cake.
- Use a toothpick to lightly trace a flourish design into the cake's side before going over it with black icing. Alternatively, place a cake stencil on the side of the cake and use it to create a flourish design above the tombstones.
- Place ghosts on top of the cake.
- Using the shell tip and black buttercream, add a border around the top edge of the cake.
- Add a black border using a round or shell tip to the bottom of the cake; alternatively, you could also place candy rocks at the bottom.
Drop Dead Designs
A festive Halloween cake design doesn't need to send you to an early grave. Instead, come up with a few drop dead graveyard cake designs that will be sure to stand out at your next party.


